Client Setup
This page walks through the three clients most Lumia streamers use, in full detail. Start with the quickstart if you haven't enabled the API yet, then follow the section for your client.
Using something else? Skip to Any other MCP client at the bottom.
Before you begin
You need three things from Lumia Stream, and they're all on one page.
- Open Lumia Stream.
- In the sidebar, go to Settings → API.
- Check Enable Developers API.
- Note the port (default
39231) and copy your token.
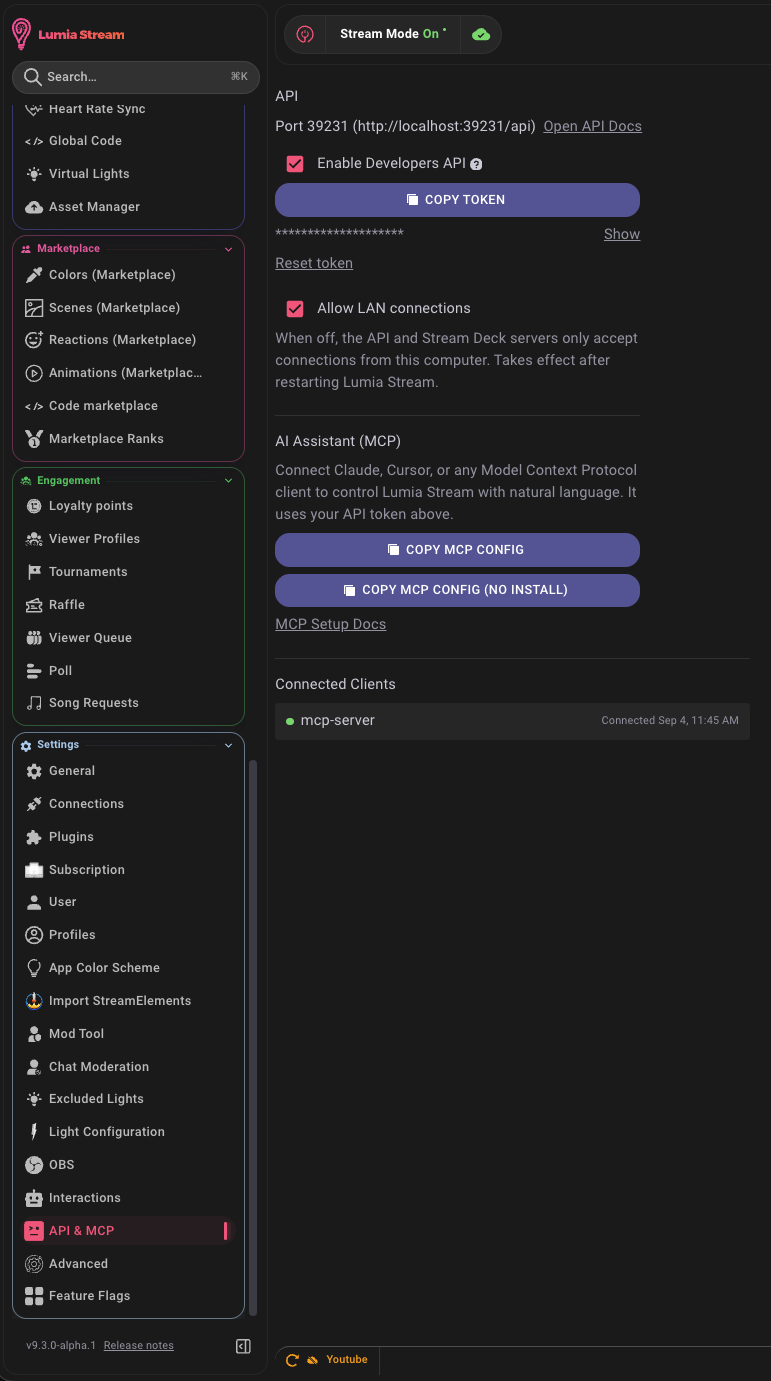
That page also has two copy buttons that build the config for you:
| Button | Gives you | Use it when |
|---|---|---|
| Copy MCP Config (No Install) | An HTTP config pointing at http://localhost:39231/api/mcp | Your client supports MCP servers over HTTP with headers. Nothing to install. |
| Copy MCP Config | An npx config that runs @lumiastream/mcp | Your client only launches local programs, or HTTP doesn't work. Needs Node.js 20+. |
It's the same token as the REST API. Anyone who has it can control your stream. Don't paste it into a file you commit to a repo, and don't show it on stream while you're setting this up.
The MCP server talks to Lumia on your own machine. If Lumia Stream is closed, the tools will connect but every call will fail.
Claude Desktop
Claude Desktop reads MCP servers from a JSON file, and shows each one's status in its Developer settings.
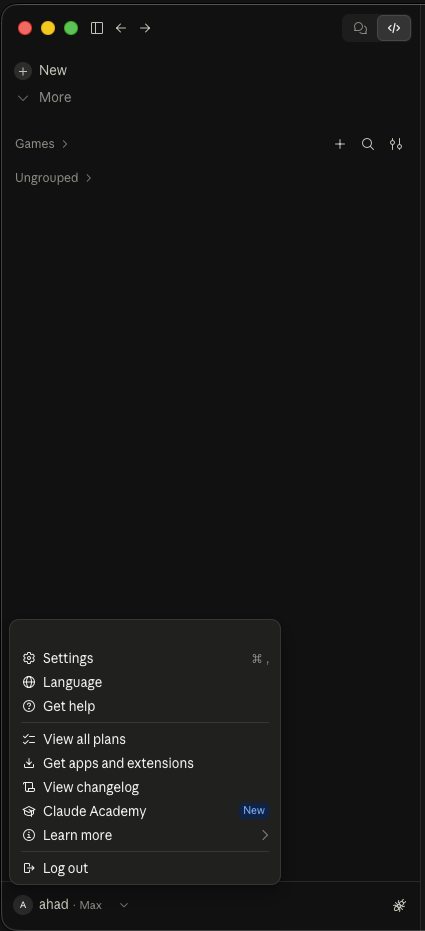
Step 1: Open Settings
Click your name at the bottom-left of the sidebar and choose Settings, or just press Cmd+, (Ctrl+, on Windows).
Step 2: Open the config file
In the Settings window, scroll the left sidebar to the Desktop app group and click Developer. You'll see a Local MCP servers panel. Click Edit config.
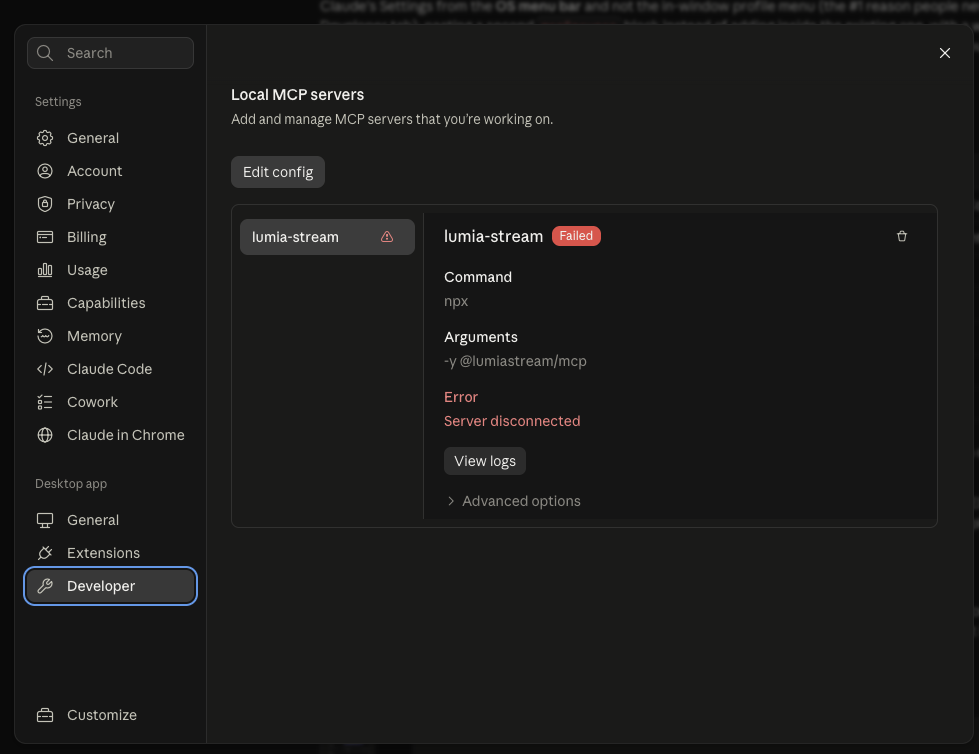
That opens claude_desktop_config.json in your default editor, creating it if it doesn't exist yet:
- macOS:
~/Library/Application Support/Claude/claude_desktop_config.json - Windows:
%APPDATA%\Claude\claude_desktop_config.json
Step 3: Paste the config
Paste what you copied from Lumia. If the file was empty, it should end up looking exactly like this:
{
	"mcpServers": {
		"lumia-stream": {
			"command": "npx",
			"args": ["-y", "@lumiastream/mcp"],
			"env": {
				"LUMIA_TOKEN": "your_token_here",
				"LUMIA_PORT": "39231"
			}
		}
	}
}
Don't paste a second mcpServers block — that's invalid JSON and Claude will silently ignore the whole file. Add lumia-stream inside the existing object instead:
{
	"mcpServers": {
		"some-other-server": { "command": "..." },
		"lumia-stream": {
			"command": "npx",
			"args": ["-y", "@lumiastream/mcp"],
			"env": { "LUMIA_TOKEN": "your_token_here" }
		}
	}
}
Note the comma after the previous server's closing brace.
Save the file.
This is the most common reason the server shows Failed. Claude Desktop doesn't run your shell's startup files, so it often picks up whichever npx nvm made the default — frequently a very old one. Old npx doesn't understand the -y flag, so it prints its own help text and exits immediately.
Check what you'd be handing it:
npx --version && node --version
If Node is older than 20, put the full path to a modern npx in command instead:
"command": "/Users/you/.nvm/versions/node/v22.22.3/bin/npx"
Find yours with nvm which 22 or ls ~/.nvm/versions/node. Simplest alternative: use the Copy MCP Config (No Install) HTTP config, which doesn't involve Node at all.
Step 4: Fully restart Claude
Closing the window is not enough — Claude keeps running in the background and won't reload the config.
- macOS: press Cmd+Q, or choose Claude → Quit Claude. Then reopen it.
- Windows: quit from the system tray icon, then reopen it.
Step 5: Check that it connected
Go back to Settings → Developer. The Local MCP servers panel lists lumia-stream with its command, arguments, and current state. A healthy server shows no error; a broken one shows Failed with a View logs button.
Its tools also appear in chat under the Add files, connectors, and more button at the bottom-left of the message box, via Connectors → Manage connectors.
Then ask Claude:
"What can you see in my Lumia setup?"
It should call get_settings and describe your commands, alerts, lights, and scenes.
If it says Failed
Click View logs, or read them directly:
tail -n 40 ~/Library/Logs/Claude/mcp-server-lumia-stream.log
On Windows the same logs are in %APPDATA%\Claude\logs. mcp.log covers connections — it also prints the exact npx path Claude chose, which is how you catch the nvm problem above. mcp-server-lumia-stream.log has the server's own output.
The usual causes, in order of how often they happen:
| What you see in the log | Cause | Fix |
|---|---|---|
A wall of npx [options] usage text, then the server exits | Old npx that doesn't support -y | Use a full path to a Node 20+ npx, as above |
command not found | Claude can't find npx at all | Use the full path from which npx |
| The file appears to be ignored entirely | Invalid JSON — usually a missing or extra comma | Re-check the config, especially if you added a second server |
| Server starts, but every tool call fails | Lumia is closed, the API is off, or the token is stale | Re-check Settings → API in Lumia |
See Troubleshooting for the rest.
Codex and ChatGPT Desktop
Codex and the ChatGPT desktop app share the same MCP configuration. You can set it up through a settings panel or through ~/.codex/config.toml — they end up in the same place.
ChatGPT Desktop app
-
Open Settings and find the MCP servers panel.
-
Choose to add a server, and give it the name
lumia-stream. -
If your build offers an HTTP transport, use it:
Field Value Name lumia-streamTransport HTTP URL http://localhost:39231/api/mcpHeader Authorization=Bearer your_token_here -
Otherwise choose STDIO:
Field Value Name lumia-streamTransport STDIO Command to launch npxArguments Two separate arguments: -y, then@lumiastream/mcpEnvironment variables LUMIA_TOKEN= your tokenEnvironment variable passthrough Leave empty Working directory Leave empty -
Save, then enable the server in the list.
The app doesn't always inherit your shell's PATH, so it can't find npx. Run this in a terminal:
which npx
Then paste the full path it prints (something like /usr/local/bin/npx) into the Command to launch field instead of just npx.
Codex IDE extension
Open the extension's gear menu and use its MCP server management screen. The fields are the same as the ChatGPT desktop app above, and it writes to the same ~/.codex/config.toml.
Codex CLI
The fastest route is one command:
codex mcp add lumia-stream --env LUMIA_TOKEN=your_token_here -- npx -y @lumiastream/mcp
Or edit ~/.codex/config.toml yourself. For the npx setup:
[mcp_servers.lumia-stream]
command = "npx"
args = ["-y", "@lumiastream/mcp"]

[mcp_servers.lumia-stream.env]
LUMIA_TOKEN = "your_token_here"
For the HTTP setup, reading the token from your environment:
[mcp_servers.lumia-stream]
url = "http://localhost:39231/api/mcp"
bearer_token_env_var = "LUMIA_TOKEN"
Start Codex with LUMIA_TOKEN set. If the config file is private to your machine, you can hardcode the header instead:
[mcp_servers.lumia-stream]
url = "http://localhost:39231/api/mcp"
http_headers = { "Authorization" = "Bearer your_token_here" }
Check it worked:
codex mcp list
You can also run /mcp inside Codex to see connected servers and their tools.
Cursor
Step 1: Open MCP settings
Open Cursor Settings and go to the Customize page in the sidebar, where MCP servers are listed and can be enabled or disabled.
You can also edit the file directly, which is often quicker:
- All projects:
~/.cursor/mcp.json - This project only:
.cursor/mcp.jsonin your project root
Step 2: Add the server
Cursor supports both connection types. Try HTTP first — there's nothing to install:
{
	"mcpServers": {
		"lumia-stream": {
			"url": "http://localhost:39231/api/mcp",
			"headers": {
				"Authorization": "Bearer your_token_here"
			}
		}
	}
}
If that doesn't connect, use npx instead:
{
	"mcpServers": {
		"lumia-stream": {
			"command": "npx",
			"args": ["-y", "@lumiastream/mcp"],
			"env": {
				"LUMIA_TOKEN": "your_token_here"
			}
		}
	}
}
Save the file.
If you used .cursor/mcp.json inside a project, add it to .gitignore. Pushing a real token to a repo means anyone who can read that repo can control your stream.
Step 3: Check that it connected
Return to the MCP settings and refresh the list. lumia-stream should show as connected, with its tools listed.
If it doesn't, open the Output panel with Cmd+Shift+U (Ctrl+Shift+U on Windows) and pick MCP Logs from the dropdown. That panel shows server startup, tool calls, and the actual error.
Then ask in chat:
"What can you see in my Lumia setup?"
Any other MCP client
Any MCP client needs the same handful of values. For an HTTP server:
- Transport:
http(sometimes called Streamable HTTP) - URL:
http://localhost:39231/api/mcp - Header:
Authorization: Bearer your_token_here
For a local (stdio) server:
- Command:
npx - Arguments:
-yand@lumiastream/mcp - Environment:
LUMIA_TOKEN=your_token_here
On Windows, if the client can't launch npx directly, use command cmd with arguments /c, npx, -y, @lumiastream/mcp.
Claude Code registers the server with a single command:
claude mcp add --transport http lumia-stream http://localhost:39231/api/mcp --header "Authorization: Bearer your_token_here"
After connecting
Try a read-only question first, so nothing reaches your viewers:
"Call
get_settingsand summarize what Lumia tools are available."
Then a live status check:
"Call
get_stateand tell me whether any platforms are live."
Once both work, see What you can do for what to try next, or the Tool reference for all 43 tools.